8.30.2013

Broccoli and Cheese Stuffed Calzones

I am on the hunt for good freezer meals, with the birth of baby #4 approaching. I realized that Calzones are a great meal that I had forgotten about so I made a big batch and put half in the freezer for later. I also froze half of the sauce so I won't have to worry about that either!

Traditional calzones are stuffed with cheese and sausage or similar meats but I wanted something a little different. These were delicious and I can't wait to pop the rest out of the freezer!


DOUGH
4 cups flour
1 T yeast
1/2 T salt
2 T olive oil
1 1/2 cups water

Add yeast to warm water. Let it begin to foam. in food processor fitted with plastic blade mix flour, salt, oil and yeast mixture. Pulse until dough forms a ball and is smooth and elastic. Put dough aside to rise in a covered bowl for 1 hour. Roll dough into golf ball size balls and let rise for 30 minutes. Preheat oven to 450 F.

FILLING
2 cups ricotta
8 ounces mozzarella, shredded
1 cup grated parmesan
1 egg yolk - or whole egg
1 tsp dried oregano
1/2 tsp salt
1/4 tsp pepper
2 T olive oil plus 2 T for brushing calzones for baking
1 yellow or red pepper cut into small chunks
3/4 tsp garlic powder
1/4 tsp dried red pepper flakes
2 cups broccoli, either frozen or fresh that has been cooked
4 slices thick cut ham, diced

While the dough is rising, prepare the filling and the sauce. For filling, mix the cheeses, egg, oregano, salt and pepper. Meanwhile, in a large frying pan, heat the oil, then add the peppers and cook for about 3 minutes until they are beginning to soften. Add the garlic, broccoli, ham and dried red pepper flakes and saute for a few minutes. Set aside cheese mixture and vegetable mixture.

Roll each ball of dough into an 8 or 9 inch circle. Fill with a few spoonfuls of cheese and top with a few spoonfuls of veggies, leaving a 1/2 inch border around the edges. Fold dough over and seal, either crimping with your fingers or smashing with a fork.

Brush tops with egg yolk and stick those babies in the oven. Cook for 15-20 minutes, until golden brown. Serve with sauce 

TO FREEZE: Once the Calzones are formed, wrap in plastic wrap, put them in a ziploc bag and stick them in the freezer! To reheat later, cook at 450 for 25 minutes or until golden brown.

SAUCE
1 T olive oil
28 ounces crushed tomatoes in puree
2 medium crushed garlic cloves
1 tsp dried oregano
1/4 tsp sugar
1/2-1 tsp salt (to taste)
1/2 tsp pepper

For sauce, heat oil in a small sauce pan. Add garlic and cook only until fragrant - don't let it brown. Carefully add tomatoes. This will spatter if you add the tomatoes too fast, so guard your clothes and stove. Add oregano and cook for 1 minute. Add sugar, salt, and pepper to taste. continue to cook very slowly to thicken a bit while you finish the calzones.

Raspberry Bread Pudding

I have made this recipe multiple times (after pinning it on Pinterest) and the original recipe is for an army of people - like 20. So I am FINALLY writing down the pared-down recipe I use that serves my family with yummy leftovers for second helpings after the kids go to bed!


Raspberry Bread Pudding

Yield: Serves 6

ingredients:

Cream Mixture:
3/4 loaves aged, white bread, cut into 1 1/2 inch cubes (I used french bread)
2 cups heavy cream (or 1 cup cream, 1 cup milk worked great for me!)
1 1/2 cups granulated sugar
1 egg
1/2 teaspoon vanilla extract
Raspberry Filling:
2 1/2 cups raspberries, fresh or frozen
1/2 cup granulated sugar
1/4 cup apple juice
Vanilla Sauce:
1/2 cup unsalted butter
2 1/2 tablespoons flour
1 1/2 cups heavy cream
1 teaspoons vanilla
3 T. granulated sugar

directions:

1. Preheat the oven to 375 degrees F. In large bowl combine cream, sugar, egg and vanilla extract. Add bread cubes to the cream mixture. Mix until all of the bread cubes are well coated. Let sit for 30 minutes so the bread can soak up the cream mixture. Stir every five minutes.
2. In a medium bowl, combine the raspberries, sugar, and apple juice. Stir until the sugar is dissolved.
3. Layer an 8x8 baking dish 3/4 full with bread mixture, pour raspberry filling over bread mixture, spreading evenly, top with remaining bread. Place in the oven and bake for 40 minutes, or until bread turns a golden brown.
4. While the bread pudding is baking, make the vanilla sauce. In a medium sauce pan, melt butter and add flour. Stir for about 10 minutes or until the sauce has a nutty aroma, do not brown. Add cream and sugar and boil until mixture is thick, remove from heat and add vanilla extract.
5. Remove bread pudding from oven and cool for 10-15 minutes. Serve warm and top with vanilla sauce.

Adapted from twopeasandtheirpod.com, who adapted it from Kneaders!

9.18.2012

Taco Soup

This recipe is super easy and really good.


1 lb ground beef, browned and drained
1 onion, chopped with your vidalia chopper (go get one if you don't have one!)
1 qt tomatoes - If you have fresh tomatoes, toss them in a blender, skins on and all. If not, you can use 1 qt tomato juice and 2 c. tomato sauce. (I used fresh tomatoes from my parents garden and probably used closer to a quart and a half of blended tomatoes. We like leftovers around here so I wanted to make it go far. The soup was still really thick and chunky. I could have done even more tomatoes.)
1 package taco seasoning
1 can red kidney beans
2 cups frozen corn
(I added a little garlic salt just for fun)

Add all ingredients into a pot. Simmer for 30 minutes.

Serve with sour cream, cheese, and chips.

6.29.2012

Sunshine Pancake Mix

This is my favorite pancake recipe and now it is even better...because it is a mix. It is a family recipe that I am happy to share!


Ingredients:
12 c. flour
4 c. powdered sugar
2 ¼ c. powdered milk
½ c. baking powder
2 T. baking soda
1 ½ t. salt


Mix together and store in large tupperware or ice cream bucket.

Directions:
For every 1½ (to 1¾) cup dry mix add:
2 T. melted butter
1 egg
1 c. water

Mix until just combined.

5.23.2012

Calico Beans

This recipe is something my Mom makes and has made for as long as I can remember. I LOVE these beans! They go perfect with a bbq.

Calico Beans

Brown together:
1/2-1 lb bacon - I cut the bacon into 1 inch slices and cook it separately from the beef and then add it to the beef and onion once the beef is all browned)
1 lb. ground beef
1 onion chopped

Add:
1 can pork and beans
1 can kidney beans
1 can navy lima beans
(This is a really loose recipe, I just pick whatever beans I think look fun and add them to my beans. I usually double {at least} this recipe and give myself a bigger variety of beans)

Sauce:
1/2 c. brown sugar
1/2 c. ketchup (or more)
3 tsp. dry mustard
3 T. vinegar

Mix sauce ingredients together well. Add to the beans and meat mixture.

Bake at 350 for 1 1/2 hours or on low in crock pot all day. (if using a crock pot, slightly drain the beans (except the pork and beans).

This is a really loose recipe, buy any beans that look fun. I usually at least double this recipe and use all sorts of different beans Black beans, pinto beans, large and small kidney beans, etc. Just dump them all in. Canned corn is great in it and so are mushrooms (if you like those nasty things). Don't drain the beans. Leave the lid on for about an hour, then stir and take the lid off for the rest of the time. Bake until it bubbles and some of the water cooks off.


Potato Salad

Yummy! This Potato Salad came from Gary's Mom and I'm not sure where she got it from but it is certainly a family recipe. Gary always said that if the woman he chose to marry could not duplicate this recipe then she really wasn't the one. So, I'll that as a compliment, thank.you.very.much!

Potato Salad
2 1/2 c. cooked potatoes (boiled and then cooled)
4 eggs (I really like more eggs than this, so I add almost double)
1/4 c. chopped onion
1/4 c. chopped sweet pickles (I use the vlasic sweet gherkins)
1/4 c. chopped green pepper

Dressing:
2 T. sugar
1 tsp. mustard
1/2 tsp.celery seed
1 c. salad dressing or miracle whip

Combine it all and if possible refrigerate it for a while before serving.

12.29.2011

French Toast Casserole

This was our Christmas morning breakfast...and it was perfect. Prepared the night before. Popped in the oven morning of. Ready to be devoured as soon as presents were open.

Lucky for me I had some homemade Challah bread - - we enjoy eating it with clam chowder on Christmas Eve. You can find the recipe here if you want. It is delicious!

French Toast Casserole

Adapted from Virginia Willis’ “Bon Appetit, Y’all”

In a perfect world, you’ll be able to find brioche or challah for this recipe, but if your world isn’t so perfect, go with what you can get your hands on – French bread, country loaf, Texas toast, even cinnamon-raisin bread.

Serves 8

  • 4 tablespoons (1/2 stick) unsalted butter, melted
  • 3/4 cup firmly packed light brown sugar ( I thought this was a lot of brown sugar - you could definitely go with less!)
  • 1 loaf brioche or challah, sliced 1 1/2 inches thick (about 1 1/2 pounds)
  • 8 large eggs, lightly beaten
  • 1 cup whole milk
  • 1 tablespoon pure vanilla extract
  • 1/2 teaspoon ground cinnamon
  • 1/4 teaspoon ground ginger
  • Pinch of salt
  • 1/2 cup chopped pecans
  • Accompaniments: confectioners’ sugar; sorghum, cane or maple syrup
  1. Combine the melted butter and brown sugar in a 9-by-13-inch baking dish.
  2. Arrange the bread slices in the dish. (It’s fine if they overlap.)
  3. In a large bowl, whisk together the eggs, milk, vanilla, cinnamon, ginger and salt. Pour the mixture over the bread, and let it soak in.
  4. Top the bread slices evenly with the pecans.
  5. Cover with plastic wrap, and refrigerate for 3 to 12 hours.
  6. Preheat the oven to 350 degrees F. In the meantime, take the casserole out of the refrigerator, and let it sit at room temperature for 20 minutes.
  7. Bake the casserole until it’s browned and set, 30 to 45 minutes. Let it cool slightly on a wire rack. Sift confectioners’ sugar over the casserole, and serve it with sorghum, cane, or maple sugar.
(as found on Ezra Pound Cake.com)

9.12.2011

Cheese Garlic Bread {Pizza Dough}

This one here is a total keeper ladies. I came across this recipe on Pinterest and knew I HAD to try it out. I am a total lover of pizza but even more...BREAD STICKS! Yum! You will NOT be disappointed in this one. The Pizza Dough recipe was great too. Only one thing, if you have a big bosch, I would maybe try to double this recipe, there just wasn't enough dough to mix well enough. I had to take it out and transfer it to my smaller bosch.

Basic Pizza Dough:
Yield: 2-12 inch pizzas, approximately 1 lb. of dough

Ingredients:
1 C. warm water
2 1/4 tsp. yeast
1 Tbs. honey {or sugar, but go for the honey if you have it}
2 tsp. salt
2 Tbs. olive or canola oil
3 C. bread flour {give or take 1/2 c. depending on heat, humidity, and altitude}

Directions:
In mixer, stir yeast and honey into warm water. Sit for 5-10 minutes or until bubble form and mixture starts to foam. Add salt, oil, and half of the flour and mix.

Once flour has been incorporated, start adding flour in bit by bit until you get the pizza dough to the consistency you want: slightly tacky, but when you touch ti it doesn't stick to your hands.

Once you reach this state, turn the mixer on high to knead for 6 minutes. Turn a timer on and walk away. Resist the temptation to stop earlier than 6 minutes. Once done mixing, the dough should be smooth and easy to work with and the bowl should be clean.

Lightly grease the bowl and the dough so it doesn't dry out, cover with plastic wrap (or a clean towel) and let it rise 1-2 hours. Done!

We made our own version of Margarita Pizzas on the grill. Fabulous! I love the Classico Tomato and Basil Sauce, Mozzarella cheese and a little Parmesan because I love it so much, chicken pieces and some basil straight out of my beloved garden. Yummers. Oh yes, and we cook it on the grill which is so much better than the oven!

So, I used half the the dough to make two smaller pizzas and the other half to make some Cheesy Garlic Bread...keep reading.

Cheese Garlic Bread Sticks
Yield: 1-12 inch pizza

Ingredients:
1/2 recipe Pizza Dough (above)
2 Tbs. softened salted butter
2 cloves garlic, minced
1/4 c. grated Parmesan cheese (use the real stuff)
1/4 lb. grated mozzarella cheese
{salt and pepper, if desired}

Directions:
Preheat oven to 500 degrees with pizza stone inside. Mix butter and garlic in small bowl and set aside. Roll dough out into 12 inch circle. Spread butter and garlic mixture over dough and top with Parmesan and mozzarella cheeses. Top with a light sprinkling of salt and pepper, if desired. Bake 9-10 minutes or until bubbly and golden. Remove from oven and cool 1-2 minutes before cutting. Serve hot with marinara.

{Recipe from www.laurenslatest.com}

9.08.2011

Fabulous Zucchini Bread

Just in time for the harvest people. I came across this recipe the other day and with a few minor changes (simply because I didn't have the right ingredient) to the original recipe, this has been something I have made quite a few times and will yet make a few more times until I use up all that Zucchini in my fridge! :) It was wonderful...truly wonderful.

The original recipe is for one loaf of bread baked in a 9-inch by 5-inch size loaf pan. However, I made multiple smaller loaves. I like to share the goodness around, you know. Plus, it makes it so that I can't eat as much. :)

Zucchini Bread

1 lb. Zucchini (about 1.5 cups zucchini once is has been shredded and wrung through a towel to rid of excess liquid.
2 C. flour
1 tsp. baking powder
1 tsp. baking soda
1 tsp. salt
1 tsp. ground cinnamon
1 tsp. allspice
1 1/2 c. sugar
2 large eggs
1/4 c. vanilla yogurt (not fat free)
1 tbs. sour cream
6 tbs. butter, melted

Adjust oven rack to middle position and preheat to 375. Generously coat and flour bread pan(s)

Chop the ends off zucchini and finely shred zucchini, peel and all. Place shredded zucchini in a clean kitchen towel, wrap the towel and wring the ends to squeeze out all the excess water. You will need about 1 1/2 c. dry zucchini. Set aside.

In a large bowl, whisk together the flour, baking soda, baking powder, cinnamon, allspice, and salt. In a smaller bowl, whisk the sugar, yogurt, eggs, sour cream and butter until combined.

Gently fold in the yogurt mixture and zucchini into flour mixture, using a rubber spatula to fold the ingredients together until just combined. Transfer the batter to the prepared pan(s). Bake until golden brown and a toothpick inserted in the center comes out clean or with a few crumbs attached, 45-55 minutes. Cool for 10 minutes then turn out onto wire rack to cool for at least 1 hour. Store well-covered for up to three days.

Notes: I used a couple different sizes of pans. A double batch will yield you 4- 5.75x3-inch pans cooked for about 30-32 minutes and 6-3.5x2.25-inch pans cooked for about 25 minutes.

I should also note that the original recipe came from My Kitchen Cafe.

8.31.2011

Chinese Chicken Salad


My husband requested this salad this week. And when my husband actually wants to eat a salad, you better believe I jump at the request. This tasted fresh and delicious...just what he wanted.


Chinese Chicken Salad

2 green onions
1 carrot, grated
1 celery stalk, diced
1 cucumber, diced
1/2 head cabbage, chopped (or you can do a cole slaw mix, whatever)
romaine lettuce (I added about a cup to mine)
chow mein noodles
cooked chicken, diced or cooked
Asian dressing (I went with store bought because we had some)

Toss everything together and enjoy! Simple as that.

8.24.2011

Chocolate Cake with Fresh Strawberry Frosting

My baby turned one this week. I wanted something fun, flavorful and colorful to help introduce her to the magical world of desserts. This did just the trick.


Chocolate Cake

2 eggs
1 1/2 cups sugar
3/4 cup vegetable oil
2 1/4 cups flour
1/2 cup cocoa powder
1 1/2 tsp baking soda
3/4 tsp salt
1 1/2 cups boiling water
1 1/2 tsp pure vanilla extract

Set oven to 350 degrees. Prepare a 9x9 cake pan.

Combine eggs, sugar and oil until smooth. In a separate bowl, combine flour, cocoa powder, baking soda and salt. Add to egg mixture while alternating with boiling water. Stir in vanilla extract.

Bake for 20-25 minutes until an inserted toothpick comes out clean. Completely cool before frosting.

Fresh Strawberry Frosting

1 cup strawberries, finely chopped
about 1 lb of powdered sugar
4 T. butter, softened

In a large bowl, combine butter and (2 cups) powdered sugar. With a hand mixer on medium speed, mix the butter and powdered sugar. Add the strawberries and mix on low for about 2 minutes, or until the frosting is smooth. Continue to add powdered sugar until it is the desired consistency.


{recipes modified from Rookie Cookie}


8.15.2011

Flag Cake


My mom's bday is the 24th of July...which is super fun. This year I wanted to try something special for her cake and found this divine recipe from the Barefoot Contessa. It was so patriotic and really really yummy.

Ingredients

  • 18 tablespoons (2 1/4 sticks) unsalted butter at room temperature
  • 3 cups sugar
  • 6 extra-large eggs at room temperature
  • 1 cup sour cream at room temperature
  • 1 1/2 teaspoons pure vanilla extract
  • 3 cups flour
  • 1/3 cup cornstarch
  • 1 teaspoon kosher salt
  • 1 teaspoon baking soda

For the icing:


(I totally didn't want to use 4 sticks of butter or that much cream cheese. I used maybe a 1/2 stick of butter and half a stick of cream cheese. Do what you want...)

  • 1 pound (4 sticks) unsalted butter at room temperature
  • 1 1/2 pounds cream cheese at room temperature
  • 1 pound confectioners' sugar, sifted
  • 1 1/2 teaspoons pure vanilla extract

To assemble:

  • 2 half-pints blueberries
  • 3 half-pints raspberries

Directions

Heat the oven to 350 degrees F.

Butter and flour an 18 by 13 by 1 1/2-inch sheet pan.

Cream the butter and sugar in the bowl of an electric mixer fitted with the paddle attachment on high speed, until light and fluffy. On medium speed, add the eggs, 2 at a time, then add the sour cream and vanilla. Scrape down the sides and stir until smooth.

Sift together the flour, cornstarch, salt, and baking soda in a bowl. With the mixer on low speed, add the flour mixture to the butter mixture until just combined. Pour into the prepared pan. Smooth the top with a spatula. Bake in the center of the oven for 20 to 30 minutes, until a toothpick comes out clean. Cool to room temperature.

For the icing, combine the butter, cream cheese, sugar, and vanilla in the bowl of an electric mixer fitted with the paddle attachment, mixing just until smooth.

Spread three-fourths of the icing on the top of the cooled sheet cake. Outline the flag on the top of the cake with a toothpick. Fill the upper left corner with blueberries. Place 2 rows of raspberries across the top of the cake like a red stripe. Put the remaining icing in a pastry bag fitted with a star tip and pipe two rows of white stripes below the raspberries. Alternate rows of raspberries and icing until the flag is completed. Pipe stars on top of the blueberries.

I serve this cake right in the pan. If you want to turn it out onto a board before frosting, use parchment paper when you grease and flour the pan.


{From Ina Garten}

7.27.2011

Grilled Chicken Fajitas

A few things to mention before I get into telling you how great these fajitas are. First, I don't know who started this lame trend but I read it in some article the other day that New Mexico and another State (can't remember the other one, but remind me to never consider moving there) primarily use Swamp Coolers as a means to cool their houses. BARF! Did you know a Swamp Cooler basically only cools your house 15 degrees? Yeah, do the math...it's been 95 degrees out there, which means, I still sweat inside my house too. With that being said, I am on an oven strike. I have not used my oven in almost two months and refuse to use it until October when it starts to cool down a bit. It is getting really hard to do you know. How many dinners can YOU make without an oven? I am not even making bread!!! ARGH!

This had lead me to the Internet and lots of attempted creativity. We were given a bbq a few weeks ago, which has allowed me to branch out in my non-oven cooking...or rather, allow GARY to do some cooking! The other night we made grilled pizza, something I am most likely going to be making again tonight as well. :) I'll have to post that one soon too. But last night, we had the missionaries and another member in the ward over for dinner and I attempted a new recipe (I like the missionaries to be my guinea pigs for new recipes) on the grill.

The other thing I ought to mention is this: I don't know where it started but without my permission, there has been some sort of 'reputation' started among the missionaries who serve in our ward. Every time a new one comes to dinner for the first time, he says something like this "Oh, Sister Fears, I've been looking forward to coming to your house for dinner, I've heard so many wonderful things about your cooking" - HUH?! Seriously? I guess it doesn't take much to please a 19 year old boy who is on his own to cook for himself right? But, its like this talk they have behind my back and so now I feel all this pressure every time they are coming over to make sure they get a yummy meal and that it meets their expectations for a good dinner! It is causing stress people! And without an oven?!?!

Anyhow, I decided to try fajitas out on the grill yesterday and boy did they turn out! I will NEVER be making fajitas on the stove again. Honestly! Now, quick...go start thawing some chicken and try this out, you'll LOVE it!


Here is what you need:

1 Onion (I used a red onion) sliced and then cut into 1-inch strips
1 Red Pepper sliced into 1-inch strips
1 Yellow Pepper sliced into 1-inch strips
1 Tbs. McCormick Grill Mates BARBECUE Seasoning (and more to season fajitas if desired)
Olive Oil
Italian Dressing to marinade chicken in - Our FAVORITE is Ken's LITE Northern Italian with Basil and Romano. YUM!
3-4 Boneless Skinless Chicken Breasts, cut into thirds lengthwise
Flour Tortillas (Of course, the Costco kind you cook on the stove)

Toppings: Sour Cream, Shredded Lettuce, Tomatoes, Salsa, Avocados, Shredded Cheese, etc.

So, the night before or morning of, take your chicken strips (breasts sliced into thirds) and drop them in a zip lock back with enough Italian dressing to cover and marinade well. Let it sit in the fridge all day. Every time you open the fridge, just see that chicken and let your mouth water for the delicious meal you are going to make a few hours from then! :)


When the time comes to start dinner, preheat the grill on to HIGH for 10 minutes. Clean grill with wire brush. Using a soft cloth, coat grill grate litely with vegetable oil. Toss your peppers and onion slices with 1 Tbs. BBQ seasoning and 2 Tbs. olive oil. Pour into a disposable 9x13 inch foil pan. Cover pan tightly with foil, seal well. Reduce heat to MEDIUM. Place pan on grill; close lid.


Cook 10 minutes, shaking pan occaisionally. Remove from grill and set aside. Return grill heat to HIGH.


Lay chicken pieces on grill for about 2 minutes or until it has started to change color about 1/4 the way up from bottom. Turn over, and sear another 1-3 minutes. Turn chicken back over again. Reduce heat to MEDIUM and cook 12-15 minutes until internal temp. reaches 165 degrees. When chicken is getting close, put veggies back on the grill just to get them warm again.
Remove chicken from grill and chop into thin bite sized pieces. Remove veggies from grill and stir chicken into veggies.

Eat up!

Might I mention that last night was the first time in my entire life that I actually grilled dinner? Gary has always done it and he ended up having to work late and wouldn't be home in time. If I wasn't having company for dinner, I would have just waited. After a small panic attack, I decided to try my own hand at this and hope it didn't get ruined. I have to say, it all turned out quite nicely! :)

Oh, and if you have any other grilling recipes that are to die for, send them on my way. I will most definitely be using them in the next two and a half months!

6.21.2011

Orange Rolls

This is totally not my recipe and although I do love a good orange roll, I have to admit that I have never made orange rolls before in my life. This recipe will absolutely be made many more times in the very near future! These were fabulous. AND, they were still really yummy and quite fresh tasting even two days later, which I am VERY picky about. Of course, nothing beats an orange roll right off the pan out of the oven, but just know that they store quite well for a few days.


Orange Sweet Rolls


*Makes 12 rolls/twists


Dough:

¾ cup buttermilk, warm (I pour the buttermilk in a glass liquid measuring cup and microwave for 1 minute on 50% power)

6 tablespoons butter, melted and cooled

3 large eggs

4 ¼ cups (21 ¼ ounces) flour

¼ cup (1 ¾ ounces) sugar

2 ¼ teaspoons instant yeast

1 ¼ teaspoons salt


Orange Filling:

1/2 cup softened butter

1 cup sugar

2 tablespoons freshly squeezed orange juice

Grated orange rind/zest from two large oranges (reserving 1/2 teaspoon grated rind for the glaze below)


Orange Glaze:

1 1/2 cups powdered sugar

3 tablespoons freshly squeezed orange juice from about 1 orange

1/2 teaspoon grated orange rind/zest reserved from the filling above


For the dough, whisk the warmed buttermilk and butter together in a large liquid measuring cup. Combine 4 cups of flour, sugar, yeast and salt together in a standing mixer fitted with dough hook (or you can use a large bowl and mix with a wooden spoon or electric handheld mixer). With the mixer on low speed, add the buttermilk mixture and eggs and mix until the dough comes together, about 2 minutes. Increase the mixer to medium speed and knead the dough until it is smooth and elastic, about 10 minutes (knead for 15-18 minutes by hand). If after 5 minutes of kneading, the dough is still overly sticky, add 1/4 cup flour 1 tablespoon at a time until the dough clears the sides of the bowl but has a slight tacky feel when pressed between your fingertips.


Place the dough in a large, lightly greased bowl and cover the top tightly with plastic wrap. Let the dough rise in a warm place until doubled, around 2 to 2 ½ hours, depending on the warmth of your kitchen.


For the filling, combine all the filling ingredients (reserving 1/2 teaspoon orange zest for the glaze) in a small bowl and mix well. Set aside.


When the dough is ready, turn it out onto a lightly floured counter (I use my roul’pat for this step--ya'll need one of these babies!) and press it into about a 16 by 12-inch rectangle (if you have doubled the recipe, split the dough in half and roll out one half at a time). Gently brush the filling mixture over the rectangle, using an offset spatula or rubber spatula.


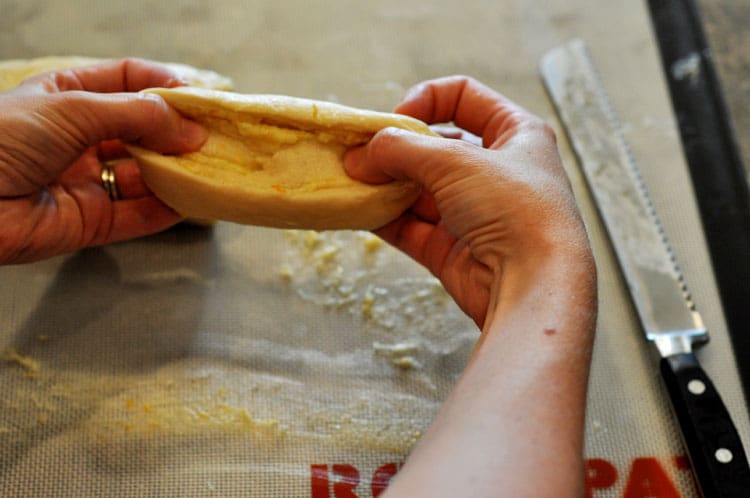
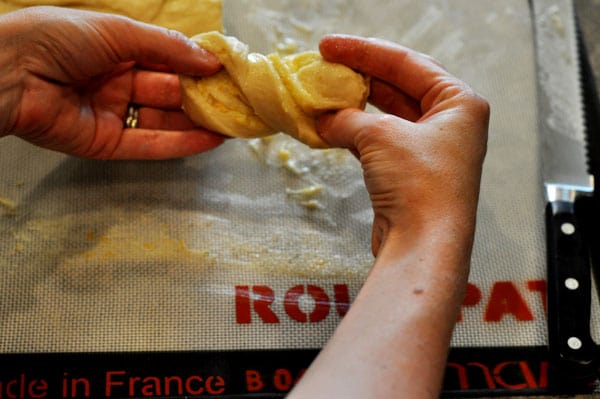
Lift the longest edge closest to you and begin rolling the dough into a tight log. Pinch the seam closed and roll the log so it is seam side down. Using dental floss, slice the log into 12 evenly sized rolls, more or less. You can slice them thinner or thicker as you like. For a traditional cinnamon-roll-look, arrange the rolls cut side down on a lined or lightly greased baking pan. If you want to try the twist method (see the pictures below), one at a time grab each sliced roll and holding on to either end simultaneously pull and twist the roll into a figure eight and place it on the prepared pan. Cover the rolls with lightly greased plastic wrap. Let the rolls rise in a warm place until doubled, 1 to 1 ½ hours.


Bake the rolls at 350 degrees for 22-25 minutes, until the rolls are lightly golden on top and cooked through. While the rolls are baking, mix together the glaze ingredients. Drizzle the glaze over the warm rolls. (I used a brush and brushed it over the entire roll instead of just drizzling it)

Grasping each side, gently stretch the roll…

…and twist it before placing on the baking sheet.
Place the rolls about an inch to two inches apart. Bake and devour!


Recipe Source: {My Kitchen Cafe}

Homemade Mint Oreo Ice Cream

Get excited everyone, this one was fabulous!!! Can I just have a proud moment and let you all know that I am the one that came up with this recipe? I mean, obviously, I started somewhere...but with about six different recipes. Needless to say, after tasting this, (and sharing it with a few friends who have all said it was the BEST homemade ice cream they have ever tasted) I am a bit proud of myself.


Sorry, no picture...but don't let that hinder your desires to make this beauty. Just know that the ice cream didn't last long enough to get a picture!


Mint Oreo Ice Cream
3 C. whole milk
3 C. skim milk
6 C. heavy whipping cream
3 C. sugar
1.5 tsp. salt
3 tsp. vanilla extract
3 tsp. peppermint extract
Oreo Cookies - I just estimated, but I would say I probably used between 30-40 cookies


**Note: I'm sure you could probably just use 6 cups of 2% milk. I don't buy 2% milk and so I used the combination of the milk that I do buy. It was wonderful, but I'm sure 2% would be wonderful too!


On stovetop, heat up the milk until it is warm (do not boil). Add sugar, salt, vanilla and peppermint and stir until the sugar has dissolved.


Pour into a bigger bowl and add the whipping cream. (You don't have to cook all the milk if you don't have a pot big enough. Just heat up enough that you can dissolve the sugar and then put it all in a bigger bowl and add the rest of the milk and whipping cream)


Put this in the fridge to cool. This makes quite a bit of ice cream (probably about 6 qts.) so if you need to make less, go ahead and split the recipe. If you have a small 1.5 qt. ice cream maker, you can just make it in batches as well and keep the rest in the fridge.


Mash oreo cookies with a potato masher in a bowl to the consistency you like and set aside until the VERY end of the ice cream making process.


Make ice cream according to the directions on your home made ice cream maker. When the ice cream is very close to being done, stop it and put the oreo cookies in. You want the ice cream to be quite thick at this point. If you do it too early, the cookies will just become mushy because the ice cream isn't frozen enough yet.


I really like to eat home made ice cream when it is soft and just finished in the maker. But if you like it harder, take it out when it is done and put it in smaller containers and freeze it for at least another couple hours to harden.


Yummers!


Another option instead of oreo is to use mini semi-sweet chocolate chips. Probably about 3 cups. And if you want to make it green, add 9 drops of green food coloring.

5.19.2011

Stuffed Breadsticks


A few weeks ago we went out to Magleby's Fresh for lunch here in Provo. My husband got the stuffed breadstick...and about passed out. It was delicious. I of course went in search of a comparable recipe on line and found this beauty. They are really really yummy and a fun alternative to pizza with the same ingredients. You could also shape these into larger personal-sized breadsticks if you wanted to be just like Magleby's. We opted for the smaller puff versions (more kid-friendly).

Stuffed Pizza Rolls

1 recipe pizza dough
marinara/pizza sauce
2 T grated Parmesan cheese
1 T olive oil or melted butter
1/2 t garlic powder
1 t dried Italian seasoning
mozzarella cheese
Pizza toppings of your choice: ie, ham and pineapple, pepperoni slices, sausage, etc.

Preheat oven to 400 degrees.

Unroll your pizza dough onto a lightly floured surface. Pat or roll the dough so it’s about 12″ by 8″. Cut it into squares about 2" by 2", or however big you want your puffs to be.

Place cheese and desired toppings on each square. (Note that you’re not putting the marinara sauce on the dough- it’s for dipping after) Just eyeball how much. You just need to be able to enclose the toppings in the dough so keep that in mind.

When all of your dough squares have cheese and toppings on them, carefully lift up each square and wrap the dough around the toppings. Pinch to make sure each ball is sealed shut and then place them seam side down in a lightly sprayed pie pan (or similar sized dish).

Brush the tops of the dough balls with olive oil or melted butter (I’ve used both and there’s not much difference in result) and then sprinkle with the garlic and Italian seasoning and top with Parmesan cheese.

Cook them in the oven for about 15-20 minutes or until golden brown on top.

Serve with your favorite marinara sauce for dipping!

{as found on Our Best Bites.com}

5.11.2011

Whole Wheat Buttermilk Pancakes


When my husband isn't around for dinner, you better believe I make breakfast for dinner - usually pancakes. Why? Because my kids devour them. I like to try new recipes to switch things up a little and this week, I tried this one from Our Best Bites.com. It was good. They are healthier than many options, but didn't taste like "healthy overload" (if you know what I mean.) Yum yum.

Whole Wheat Buttermilk Pancakes

adapted from Cooking Light

3/4 C whole wheat flour
3/4 C all-purpose flour
3 Tbs sugar
1 1/2 tsp baking powder
1 1/2 tsp baking soda
1/2 tsp salt
1 1/2 C low-fat buttermilk *
1 tsp vanilla extract
1 Tbs canola oil
1 large egg
1 large egg white
Cooking Spray or butter for pan

*As a substitute for 1 C buttermilk, place 1 Tbs lemon juice (or vinegar but I prefer lemon juice) in a 1 C measuring cup and then fill the remainder with milk. This recipe calls for 1 1/2 C buttermilk, so do the same thing with 1/2 Tbs lemon juice and remaining 1/2 C milk.

Combine flours, sugar, baking powder, baking soda, and salt in a mixing bowl and whisk together. In a separate bowl combine buttermilk, eggs, oil, and vanilla and whisk well. Add the wet ingredients into the dry and mix just until moistened and combined.

Heat a nonstick griddle or skillet to medium heat. Coat pan with non-stick spray or a little butter and then pour on pancake batter. Use about 1/4 C batter for large pancakes (5-6″) and 2 T for kid-sized ones (2 /2-3″). Wait until bubbles form and edges are set and then flip.

Makes 12 large or 24 small pancakes.


Freezer Instructions: Just lay out pancakes in a single layer on a baking sheet or other pan. Freeze until solid and then place in a zip-lock bag. To serve, just warm up in the microwave or toaster.


{As found on Our Best Bites.com}

4.12.2011

Hummus and Pita Chips

I have a crush on hummus. It only developed recently. I used to think it was gross. Turned my nose up at it. And then, I gave it a chance. It had something to do with the 3 months straight where they had hummus samples at Costco...and that was when I fell. I love it. It is a healthy yummy mid-afternoon snack! Especially with some home-baked pita chips. Just so you know, it doesn't smell that great. But it tastes delicious!!


Roasted Red Pepper Hummus

1/2 a red pepper
3 T lemon juice
1/4 cup water
6 T tahini (found by the peanut butter in the grocery store. Or try a health food store)
2 T olive oil
1 can chickpeas
1 garlic clove
1/2 tsp salt
1/4 tsp cumin
1/4 tsp cayenne

Turn your oven broiler on. Slice your red pepper into 3 or 4 wedges and place them on a baking sheet with the inside of the pepper facing down. Broil for 3-5 minutes, until the skin begins to blacken. Set aside to cool.

Combine lemon juice and water. In another bowl, whisk the tahini and olive oil.

Process the chickpeas, garlic, salt, cumin, and cayenne in a food processor. Slowly add the water mixture. Slowly add the tahini.

Once the pepper has cooled, slide the skin from the meat of the pepper and discard it. Add the remaining pepper wedges to the food processor and process until smooth.

Chill for 30 minutes. Serve with pita chips!

For homemade pita chips, buy a bag of pitas (I love the whole wheat kind!). Slice the pockets open and cut each pita into wedges. Drizzle with olive oil or spray with Pam and shake garlic salt over the top. Cook in a 300 degree oven for 20-30 minutes, until they are as crispy as you like.

Enjoy!

4.06.2011

Chicken Teriyaki


2 boneless chicken breasts, sliced into thin slices
1/2 cup soy sauce
1/2 cup sugar
1/2 teaspoon grated fresh ginger
1 medium garlic clove, minced or pressed
2 tablespoons mirin
1/2 teaspoon cornstarch

Combine soy sauce, sugar, ginger, and garlic in a small saucepan. Stir together mirin and cornstarch in a small bowl, then stir the mirin into the saucepan. Bring the sauce to a boil. Reduce heat to medium-low and simmer, stirring occasionally, until the sauce forms a syrupy glaze.

Heat a small amount of olive oil in a frying pan. Season the chicken with salt and pepper. Cook over medium heat until nicely browned.

Put chicken on serving platter or bowl and cover with teriyaki sauce. Serve with rice and steamed vegetables.

{Modified slightly from America's Test Kitchen:2006}

3.28.2011

Cream Cheese Chicken Potato Soup

Just made this soup tonight and it was fabulous!!! With easy, normal ingredients. My kind of meal! I thought I'd just put a link to the blog in case any of you want to check out any of her other recipes. They're mostly desserts.